DIY Home Decor: Easy Projects to Spruce Up Your Outdoor Space

Outdoor spaces play a vital role in our homes, providing essential areas for relaxation, gathering, and enjoying the beauty of nature.
These spaces serve as an extension of our living environments, offering numerous opportunities to unwind, connect with the outdoors, and even entertain guests.
Looking to transform your outdoor space into a stylish and welcoming haven? “DIY Home Decor: Easy Projects to Spruce Up Your Outdoor Space” is here to guide you through simple yet impactful projects. In this article, we’ll explore various DIY ideas that will help you enhance your outdoor area, making it the perfect spot for relaxation and entertainment.
Whether it’s a cozy patio, a vibrant garden, or a charming balcony, these outdoor areas can become cherished retreats that enhance our quality of life.
Enhancing these outdoor spaces with DIY decor projects not only beautifies the environment but also allows us to express our unique style and creativity. By creating custom decorations, we can transform our patios, gardens, and balconies into inviting sanctuaries that reflect our tastes and preferences.
Simple touches like handmade planters, whimsical lighting, or colorful cushions can make a significant difference in the overall atmosphere, turning an ordinary space into an extraordinary one.
Moreover, embracing DIY projects to spruce up these areas fosters a sense of pride and ownership in our homes.
When we invest our time and effort into crafting beautiful spaces, we create a personal connection that makes our outdoor areas more enjoyable for family and friends. These inviting environments not only encourage outdoor activities and gatherings but also provide a perfect backdrop for memorable moments, from summer barbecues to quiet evenings under the stars.
Ultimately, by enhancing our outdoor spaces, we cultivate a lifestyle that cherishes both comfort and connection with nature.
Table of Contents
1. Painted Flower Pots
Materials Needed


- Terracotta pots (various sizes)
- Acrylic paint (multiple colors)
- Paintbrushes (different sizes)
- Painter’s tape
- Sealer (e.g., clear spray sealer)
- Water and sponge (for cleaning)
Step-by-Step Instructions
- Prepare the Pots: Start with clean, dry terracotta pots. Use a damp sponge to remove any dust or dirt.
- Tape Off Sections: Use painter’s tape to create designs or sections on the pot where you don’t want paint. This can help create clean lines and shapes.
- Paint the Base Coat: Choose your base color and apply a coat of paint to the entire pot. Allow it to dry completely, which usually takes about 1-2 hours.
- Add Designs: Once the base coat is dry, remove the tape (if used) and start painting your designs. You can create patterns, shapes, or even abstract art—let your creativity shine!
- Finish with a Sealer: After the paint has dried, apply a clear sealer to protect your artwork from the elements. Follow the instructions on the sealer for the best results.
Tips for Personalizing Designs
- Use Stencils: Consider using stencils for consistent patterns or letters. This can add a professional touch to your pots.
- Experiment with Techniques: Try sponging, stippling, or even splatter painting to create unique textures.
- Incorporate Natural Elements: Press leaves or flowers against the wet paint for an interesting imprint effect.
- Match Your Style: Choose colors that complement your outdoor space or reflect your style. Bright colors can add vibrancy, while neutral tones can create a more calming atmosphere.
2. Outdoor Wall Art
Ideas for Materials


When creating outdoor wall art, various materials can bring your vision to life. Consider using:
- Wood: Reclaimed wood can add a rustic charm. Pallets or wooden boards are great for larger pieces.
- Canvas: Outdoor canvas or weather-resistant fabric can be used for vibrant paintings or fabric collages.
- Metal: Cut-out metal shapes or welded art pieces create a striking and durable option.
- Mosaics: Broken tiles, glass, or stones can be arranged to create stunning mosaic art that withstands the elements.
Guide to Creating Different Styles
To create diverse styles of outdoor wall art, consider the following techniques:
- Mosaics: Start by sketching your design on a wooden board. Use adhesive to attach your tiles or glass pieces, filling in gaps with grout once the adhesive dries.
- Stencils: Use stencils to paint designs or quotes onto wood or canvas. Secure the stencil with tape and apply paint using a sponge or brush, ensuring a clean finish.
- Mixed Media: Combine different materials, like wood and fabric, to create layers of texture. You can attach fabric with adhesive or staple it to a wooden frame.
- Painted Murals: For a large statement piece, consider painting a mural directly onto a wall or canvas. Use outdoor acrylics that are designed to resist fading and weather damage.
Placement Suggestions
When choosing where to place your outdoor wall art, keep the following in mind:
- Focal Points: Position art pieces where they can be easily seen, such as above seating areas, on accent walls, or behind planters.
- Sunlight Exposure: Be cautious of direct sun exposure, as it may fade certain materials. Consider shaded areas for more delicate pieces.
- Varying Heights: Hang artwork at varying heights to create visual interest and allow for different levels of engagement. Including lower pieces can invite close examination.
- Surrounding Elements: Create a balanced look by considering nearby plants, furniture, or structures. Art can enhance the overall outdoor aesthetic when thoughtfully integrated.
3. Upcycled Furniture
Sources for Old Furniture

Finding old furniture for upcycling can be a rewarding experience. Look for pieces at:
- Thrift Stores: These shops often have a wide selection of used furniture at affordable prices.
- Garage Sales: Local sales can yield hidden gems that just need a little love.
- Online Marketplaces: Websites like Facebook Marketplace, Craigslist, and Freecycle can have listings for free or low-cost furniture.
- Family and Friends: Ask around; you might be surprised at what others are looking to discard.
Creative Painting and Refurbishing Methods
Once you’ve found your furniture, consider these methods to give it new life:
- Chalk Paint: This type of paint provides a matte finish and adheres well to surfaces without the need for primer. It’s perfect for a vintage look.
- Decoupage: Use decorative paper or fabric to enhance surfaces. Apply with decoupage glue for a fun, personalized touch.
- Stencil Designs: Create patterns with stencils to give a fresh, artistic flair. Choose stencils that match your outdoor style for a coordinated look.
- Sand and Stain: For wooden pieces, lightly sanding can reveal the wood’s natural beauty, which can then be enhanced with a new stain or sealant.
Ideas for Functional Outdoor Uses
Upcycled furniture offers great functionality in outdoor spaces. Think about:
- Bench Seating: Old wooden crates or benches can be refinished and used as seating around a fire pit or dining area.
- Side Tables: A small nightstand can make an excellent side table for outdoor lounging, perfect for holding drinks or books.
- Planter Stands: Repurpose an old ladder by turning it into a tiered plant stand, allowing for stunning vertical displays of flowers or herbs.
- Outdoor Storage: A refurbished trunk can serve as stylish storage for cushions, gardening tools, or outdoor games, keeping your space organized and clutter-free.
4. String Lights and Lanterns
Types of Lights to Use

When it comes to outdoor lighting, choosing the right type of light is key to creating a warm and inviting atmosphere. Consider the following options:
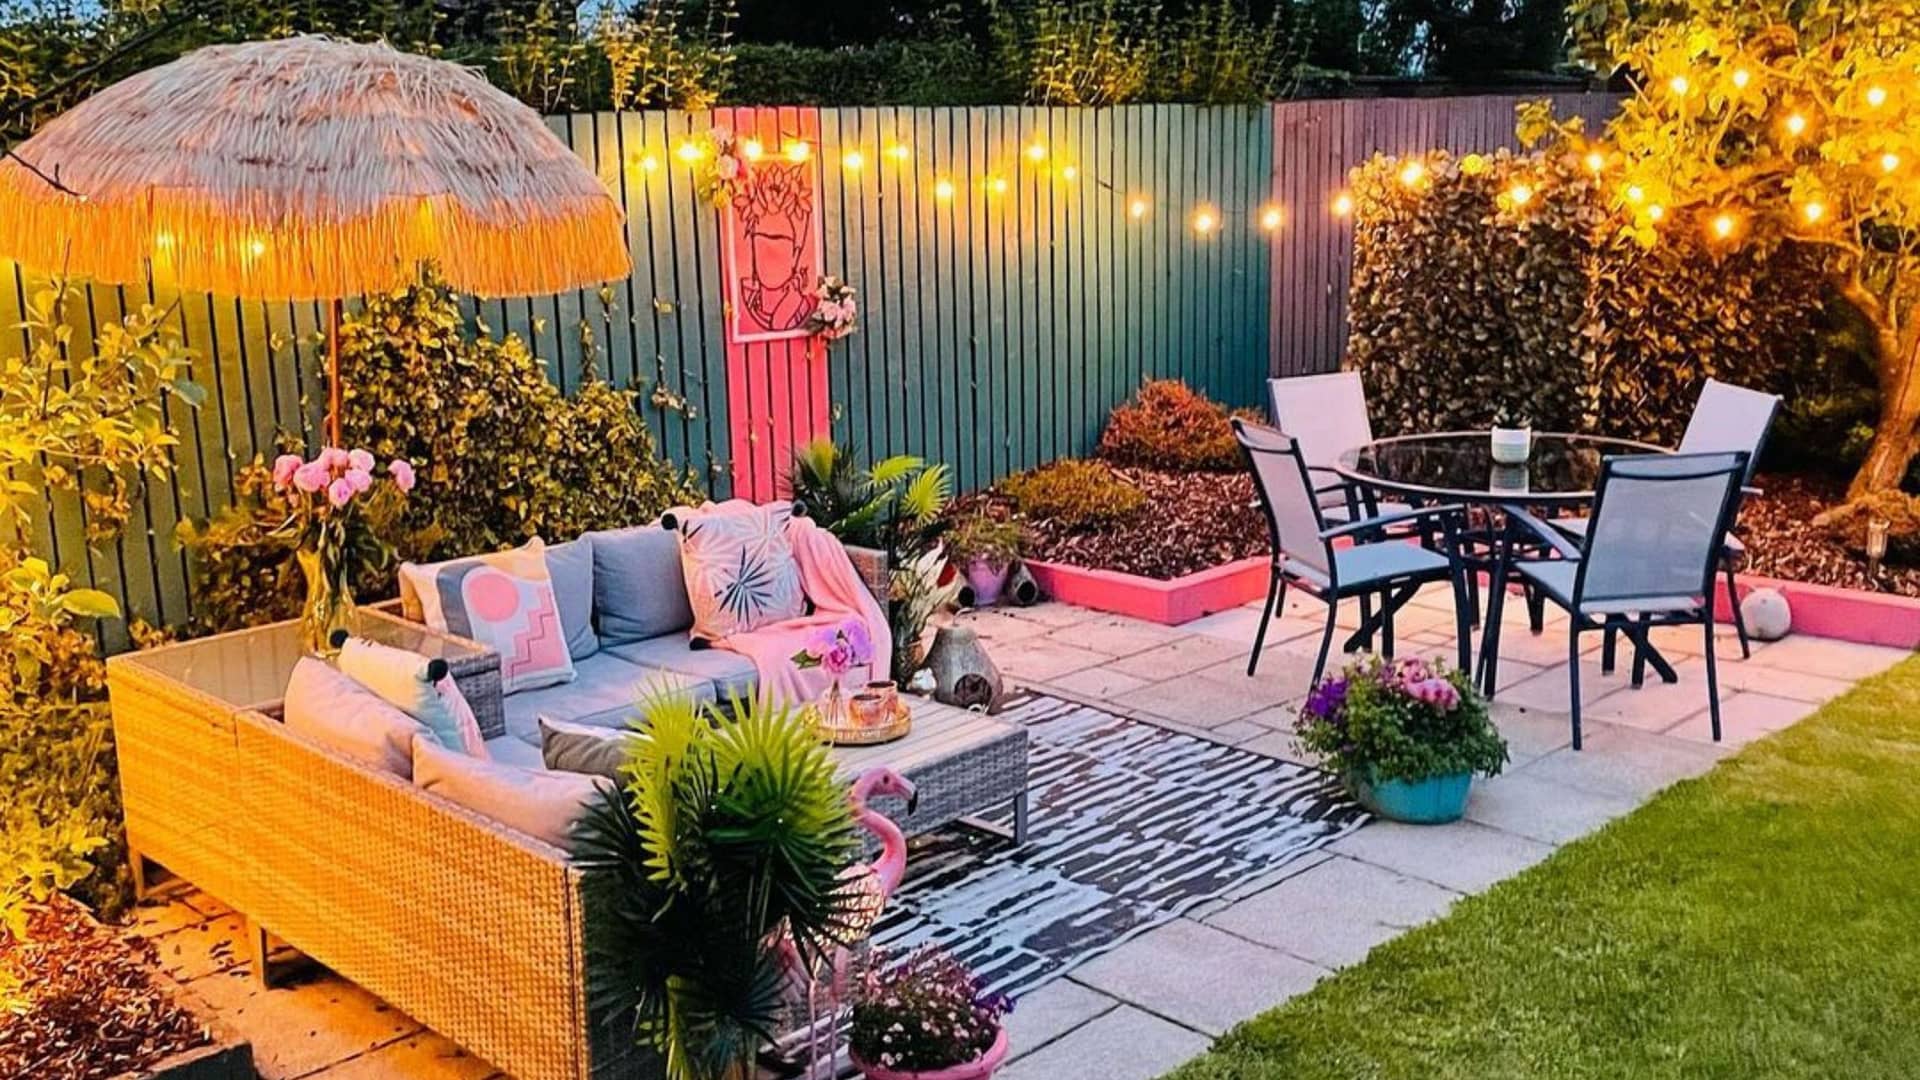
- String Lights: These are versatile and can be draped across patios, wrapped around trees, or hung from beams. Look for weather-resistant options with LED bulbs for energy efficiency.
- Lanterns: Available in various styles, lanterns can be battery-operated or solar-powered. They can be placed on tables, hung from hooks, or grouped for a more dramatic effect.
- Fairy Lights: Thin, lightweight, and often battery-powered, fairy lights can be strung in unique shapes and are perfect for adding a touch of whimsy to your outdoor space.
- Spotlights: Use spotlights to highlight specific features such as plants, sculptures, or architectural elements in your garden.
Hanging and Arranging Techniques
How you hang and arrange your lights can greatly affect the ambiance of your outdoor area:
- Layering: Mix different light types for depth. Combine string lights with lanterns and spotlights to create a layered look.
- Height Variation: Hang lights at varying heights to draw the eye upward and create a more dynamic visual experience. This approach makes the space feel more intimate.
- Patterns: Create patterns with your lights, like zig-zags or arches, to add interest. This can be especially impactful when draped above seating areas or along walkways.
- Clusters: Group several lanterns or string lights together in certain spots to create focal points, which can serve as inviting gathering areas.
Creating a Cozy Atmosphere
The ultimate goal of using string lights and lanterns is to cultivate a cozy atmosphere:
- Warm Light: Opt for warm-toned bulbs to produce a soft, inviting glow. This color temperature feels more relaxing and is perfect for evening gatherings.
- Dimmed Effect: Consider using dimmers or smart bulbs to control the brightness, allowing you to adjust the light according to the mood and time of day.
- Natural Elements: Incorporate greenery or floral elements with your lights. Wrapping lights around tree branches or placing lanterns among plants can create a charming blend of nature and light.
- Seating Areas: Position your lights above seating areas to create personal enclaves that feel intimate and welcoming, encouraging guests to linger and enjoy their surroundings.
5. DIY Outdoor Cushions
Selecting Weather-Resistant Fabrics
When creating outdoor cushions, it’s important to choose fabrics that can withstand the elements.
Look for materials that are specifically labeled as weather-resistant or outdoor-rated, such as acrylic or polyester. These fabrics are designed to resist fading, mildew, and moisture.
Additionally, consider options with a water-repellent finish for extra protection against spills and rain.
Simple Sewing Techniques
You don’t have to be a sewing expert to make your cushions. Start with basic techniques like straight stitching and hem finishing.
For a simple cushion cover, cut two pieces of fabric to your desired size, allowing for seam allowances. Sew the edges together, leaving an opening for padding. After turning the cover inside out, fill it with foam or batting, and sew the opening closed.
For added durability, consider using double-stitching or reinforcing seams.
Choosing Colors and Patterns to Match the Outdoor Aesthetic
Select colors and patterns that complement your outdoor space.
Bright, vibrant hues can energize a dull area, while neutral tones provide a calming effect.
Floral or geometric patterns can add visual interest, so choose designs that echo the surrounding landscape or existing decor.
It’s a good idea to incorporate a mix of solids and prints for a balanced look, ensuring your DIY cushions not only provide comfort but also enhance the overall outdoor aesthetic.
Conclusion
In summary, the projects outlined in this guide—upcycling furniture, creating ambient lighting, and making DIY outdoor cushions—present exciting opportunities to significantly enhance your outdoor space. Each project not only boosts functionality but also infuses your area with your personal style and unique creativity.
For instance, upcycling furniture not only helps in conserving resources but also allows you to craft one-of-a-kind pieces that tell a story and fit perfectly in your outdoor setting. Similarly, creating ambient lighting can transform the atmosphere of your patio or garden, making it a cozy haven for evening gatherings or quiet relaxation under the stars.
The DIY outdoor cushions can add both comfort and a splash of color, elevating the aesthetic appeal of your seating areas.
By incorporating these unique elements into your outdoor space, you can transform an ordinary setting into a welcoming retreat that truly reflects your personality and lifestyle.
We encourage you to unleash your creativity, experiment with various materials and designs, and most importantly, enjoy the fulfilling process of personalizing your outdoor environment.
Embrace the joy of crafting; whether it’s through repurposing old items or exploring new decorative ideas, you’ll create a space that not only serves as an extension of your home but also a sanctuary for relaxation and social gatherings.
Let your imagination run wild as you curate an outdoor area that is uniquely yours!


